
Drill Table
Win32 and 64, EnglishGeneral Usage Instructions
It is required to pre-configure the list of hole diameters and the list of columns.
Draw a 3D Solid model of your product. Add an additive for fasteners and fittings (you can use the Fixture and Drill commands).
Lay out all parts in the XY plane using the LAY command. If you do not like the location or the spread of the part after laying out, you can rotate them as you like. But it is important to keep the position of the parts lying on the XY plane.
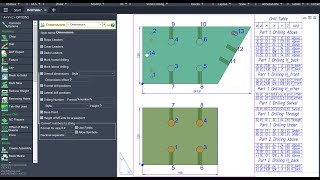
Please note that the coordinates of the holes are set from the lower left corner of the overall box of the part. Even if the part is cut or rounded in this corner, the X coordinate will still be calculated from the leftmost point of the part, and the Y coordinate from the lowest point.
Do not call the NC Prepare command immediately. It will flatten the parts and the Drill Table command will not work. Fill in the table first, and then draw out the outlines and annotations.
You can place the number of holes in the drawing - use the DimDet command with the drill numbering option enabled. It is important that both the Drilling Table and DimDet use the %number% substitution, which displays the part number independent of the order of the rows in the Drilling Table.
Select the part and call the DrillTable command. You can select several parts at once - in any case, a single table will be created. You can select a viewport or multiple viewports, in which the laid out details are visible. You can add an empty table to the selection that you want to fill - then the program will not ask you to select a table.
If nothing has been selected in advance, the program will prompt you to select a part. There are two options in the request:
-
SwitchStyle: Quickly switch between presets by number.
-
TUNE: Opens the table settings dialog. But in this dialog there are no settings for the CNC style, hole diameters.
Next, the program will extract hole data from all selected parts and create a table. If you select several identical parts, you will get several identical lines for each hole - the program does not combine identical parts.
You can split a table into multiple sheets with the TableSplit command.
Screenshots


Commands
| Ribbon/Toolbar Icon | Command | Command Description |
|---|---|---|

|
DrillTable |
Follow the command line instructions. |
Installation/Uninstallation
The installer that ran when you downloaded this app/plug-in from the Autodesk App Store will start installing the app/plug-in. OR, simply double-click the downloaded installer to install the app/plugin. You may need to restart the Autodesk product to activate the app/plug-in. To uninstall this plug-in, exit the Autodesk product if you are currently running it, simply rerun the installer, and select the "Uninstall" button. OR, click Control Panel > Programs > Programs and Features (Windows 10/11) and uninstall as you would any other application from your system.
Additional Information
Known Issues
Contact
Author/Company Information
Support Information
Support is provided by e-mail avc.programming@gmail.com
You can ask any questions about the work of A>V>C> programs, their installation and configuration, optimization of the work of engineers, and setting up business processes in the exhibition business. Help is provided to all users, regardless of whether they made a donation or not. Any suggestions and comments are welcome for further improvement of the programs.
The main method of communication is e-mail. You can write in any language. If you do not write in English, then write in short, simple but complete sentences without abbreviations and without special terms.
Do not forget to attach the problem dwg-file to the letter.
Telegram: @avc_programming
WhatsApp: A V C Programming
Version History
| Version Number | Version Description |
|---|---|
|
2024.09.04 |
You can now extract data from objects visible in ModeDoc=ViewBase views (AutoCAD only) New data source setting - "Select view or viewport". This is done specifically for ModelDoc views. You can select the data source in the settings (Model, all sheet viewports, other drawings) and not select objects when calling the command. Options form: The column list automatically adjusts its height. |
|
2024.05.04 |
Substitutions: new %number% substitution for CNC-drill-contours = the program numbers all drills in order of their diameter and location. Substitution has been added to the default settings for the Drill Table. Substitutions fixed: %drill% (directions of lateral drilling) from h_back and h_front were confused. Fixed a bug in AutoCAD 2025 when opening the substitution input window. |
|
2024.03.03 |
AutoCAD 2025 compatibility. |
|
2023.11.01 |
All updates for November 2023. |
|
2023.10.00 |
Added 2024 support. |
|
2022.01.00 |
Added 2024 support. |
