
Synapcus:360 Activities and Chat App
, EnglishGeneral Usage Instructions
Prepare the Synapcus Activities and Chat App for using BIM 360 data
Prerequisites:
In order to be able to use the “Synapcus Activities and Chat App” (SAC-App) from Autodesk App Store, you must have:
- At least one BIM 360 User Account with Admin Rights
- At least one Synapcus User Account with Project Manager Rights (PM)
- Supported browsers are: Chrome, Firefox, Safari.
Instructions for Adding Synapcus Activities to a BIM 360 Account:
BIM360 Admins can find the Synapcus Activities BIM 360 Integration in Account Administration under the “Apps” tab. Select to add to your BIM 360 Account.
Your Synapcus Activities BIM 360 Integration is now active in BIM 360.
After installing the App using your BIM 360 Admin account, please follow these steps:
1. Connect your Synapcus account with your BIM 360 account by using the "User Settings" dialog (by clicking on the user's picture in the top right corner). In this dialog and in the box "Plugins Control" please click the "Connect" button for the BIM 360 Connection. Follow the steps needed for the BIM 360 connection (see video: https://www.youtube.com/embed/bKg7Wq0i69E)
2. In the Synapcus upper toolbar use the "+" button to create a new sale opportunity (a sale opportunity is the predecessor of a project). Fill in the mandatory fields and save it. For details see the complete video: https://www.youtube.com/embed/yU9RADpUQ2A
3. In the newly created sale opportunity click on the "Complete" button to transform it into an active project.
4. In the newly created Synapcus project, create a new position under Project/Positions/New-->Position (name it for example "Visualisation").
5. In the Synapcus project form, create a new participation under Project/Participations/Add-->Participation (for you as a project participator).
6. In the Synapcus project form, use the button "BIM 360 / Create BIM 360 project..." to start the creation of a corresponding project in the BIM 360 system.
7. Now go into your BIM 360 account admin, search the newly created project and be sure to give yourself as an admin user all the rights for services (also "Insight")
8. In the BIM 360 project (BIM 360 Documents) create a new subfolder (let's name it "Synapcus")
9. After this creation the Synapcus project is connected with the BIM 360 project (you will see the blue BIM 360 button on the top of the project form). Now at any time you can synchronize the entire project using the button "BIM 360 / Synchronize...".
10. To download/link a BIM 360 3D-model to Synapcus, set the Synapcus project form to "Edit". In the tab section, "Documents", please select the action "Download from BIM 360 Cloud". This will pop up a dialog box with all your existing BIM 360 project folders and files. Here you can choose the file/3D-model which shall be available in Synapcus (i.e. from the folder “Synapcus”).
For further information about creating a new trial Synapcus project and generate a corresponding BIM 360 project also see the user guide: http://opt.synapcus.com/public/docs/synapcus-bim360-app-installing-instructions.pdf
For using the Synapcus Activities and Chat App inside of Synapcus:
1. Login to Synapcus (test credentials can be obtained from info@qalgo.de)
2. Go to "Home / My Cockpit".
3. Open your newly created project which was already connected to BIM 360 (see above the project creation). The project list where you participate can be found on the right side of the Cockpit.
4. Inside of the project form, under the "Documents" tab you can open an already downloaded/linked BIM 360 3D-model and create activities/issues on that model. Also virtual routes can be recorded and saved inside of this 3D-model.
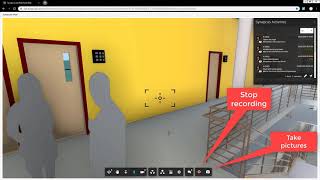
5. After that, in the integrated Forge Viewer please use the right-sided buttons from the bottom toolbar for: showing a list of all the activities (List symbol), creating a new activity (+ Symbol) or create a new route through the Synapcus Route Recorder.
For further information about creating activities and comments, please see the attached videos.
Screenshots


Commands
Installation/Uninstallation
Additional Information
Known Issues
Supported browsers: Chrome, Firefox, Safari
Contact
Author/Company Information
Support Information
For support and further information please write us at info@qalgo.de or directly call us directly on +49 721 8203410. We are happy to support you.
After the 14-days trial period, please contact our sales +49 721 95763 720 (or sales@qalgo.de) for purchasing Synapcus licenses.
Version History
| Version Number | Version Description |
|---|---|
|
2.32 |
This version implements an intuitive visual project collaboration and messaging through activities creation and management directly in the Autodesk Forge-Viewer (Synapcus Forge App). System entities like projects, organizations, users, documents, issues, comments will be synchronized between Synapcus and BIM 360. |
