
CupixWorks
, EnglishCupix Inc.
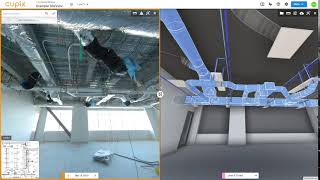
360° Digital Twins of your construction project accessible anytime, anywhere
General Usage Instructions
To connect a BIM 360 project to a CupixWorks Project:
- From the CupixWorks web app, navigate to the workspace and open the project you are interested in linking to Autodesk® BIM 360™.
- In the Project Center, from the left menu under Templates click Integrations.
- If the project has not been linked to BIM 360, within the BIM 360 dialogue box the 'Linked BIM 360 Project' status will appear as 'Not Set'.
- From the BIM 360 box, click Link to BIM 360 Project.
- The AutoDesk BIM 360 sign in will appear in a separate window.
- Enter your AutoDesk BIM 360 login email and password and click Sign In.
- From the Authorize Application screen, click Allow to enable CupixWorks to access your BIM 360 account.
- From the Choose BIM 360 Project window, select your BIM 360 account from the drop-down list, and click the project name > Link.
- The BIM 360 box will show the specific name of the project after 'Linked BIM 360 Project'.
Create BIM 360 Issues and RFIs from CupixWorks SiteView
- From the annotations menu on the left, click the name of the annotation group you would like to add the BIM 360 issue or RFI to > Add Annotation Icon > BIM 360 > Issue or RFI. Please note You must have an annotation group to create BIM 360 issues and RFIs. If there are no appropriate annotation groups in SiteView, you can add a new annotation group.
- In the New BIM 360 Issue or RFI window, enter the required fields.
- Click Next to create the Issue or RFI in BIM 360.
- BIM 360 will automatically open in a new tab to display the Issue or RFI you created in SiteView, and you can continue filling out issue details.
Access CupixWorks SiteView from BIM 360 Issue or RFI
- Within Autodesk BIM 360, navigate to and open the BIM 360 Issue or RFI of interest.
- Click the deep-link within the description field for Issues or location field for RFIs to open up SiteView in a new window and see the space that matches the BIM 360 issue.
- Please note this link is automatically generated with coordinates leading to the exact SiteView geolocation and view direction where the BIM 360 issue was created.
Add Markups from SiteView
- From the annotations menu on the left, open the BIM 360 annotation you are interested in, and click More > Attach > Markup.
- Enter the name of the markup, then click Next.
- SiteView automatically screenshots the view in the digital twin display window and provides a palette of tools you can use to mark up the image.
- Once you are finished, click Save in the upper right, and the markup will automatically be added to the Issue or RFI in both SiteView and BIM 360.
Open Issue or RFI in BIM 360 from CupixWorks SiteView
- From the annotations menu on the left, open the BIM 360 annotation you are interested in, and click Open in BIM 360.
- BIM 360 will open in a new tab with the Issue or FYI displayed.
Screenshots


Commands
Installation/Uninstallation
Additional Information
Known Issues
Contact
Author/Company Information
Cupix Inc.
Support Information
For inquiries and additional support, please email cs.works@cupix.com
Or visit CupixWorks Support Site at https://support.cupix.works/support/home
Version History
| Version Number | Version Description |
|---|---|
|
1.0 |
CupixWorks first release of BIM 360 integration. - Link to BIM 360 BIM Models - Create BIM 360 Issues and RFIs within CupixWorks SiteView |
