
JoinerCAD
Win64, EnglishGeneral Usage Instructions
Once installed, the JoinerCAD extension may be opened either from the Autodesk® Fusion® toolbar or simply by switching the work environment.
Using JoinerCAD you need to design furniture geometry by using standard Fusion tools together with JoinerCAD Skeleton Design functionality, which accelerates the 3D design process significantly.
Once done, now it is time to assign various woodworking attributes to your designed 3D furniture geometry:
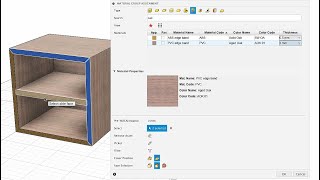
- Create and Assign certain Fill material groups to parts rather than specific materials, which can be specified in more detail in BOM by assigning the manufacturer, code, color, etc.
- Create and Assign Cover materials in the same way as filling materials. However, cover material group types may be assigned only to those parts that already have the fill material group assigned in JoinerCAD. Cover materials also can be specified in more detail in BOM by assigning the manufacturer, code, color, etc.
- Turn the texture direction to the assigned fill material or cover material groups. Use the Oversize control tool. It allows the dimensions of the workpiece to be set, which will be used to make the part.
- Insert the Intelligent Hardware in the model and generate Holes. JoinerCAD extension has its own hardware database containing standard and most common joints. You can also design your own hardware, but it has to be processed so that it can be recognized by the BOM generator of the JoinerCAD extension.
- Use the JoinerCAD BOM generator. It provides comprehensive, clear, and well-structured information. BOM shows material groups assigned to the model, their workpieces with oversize, hardware, and all other essential values, which may be represented in the BOM or not at the user's choice.
- Before exporting BOM to MS Excel or Google Drive Spreadsheet, elaborate on the Fill material groups, Cover material groups, and hardware used in the model, i.e., replace their entries with specific materials and other information, if necessary.
- Export BOM to MS Excel or Google Drive Spreadsheet and use data to start the production.
- Make a Drawing with a designed model independent copy. it allows the design of similar products with modified dimensions very quickly.
Screenshots


Commands
Installation/Uninstallation
Install:
The installer that ran when you downloaded this app/plug-in from the Autodesk App Store has already installed the app/plug-in. OR, simply double-click the exe to install the app.
Uninstall:
You can unload the add-in without uninstalling it by clicking the "Stop" button when the add-in is selected in the list box on the "Add-Ins" tab of the "Scripts and Add-Ins" dialog.
Unchecking "Run on Startup" causes the add-in not to be loaded in future sessions of Fusion
To uninstall this plug-in, exit the Autodesk product if you are currently running it, simply rerun the installer, and select the "Uninstall" button.
OR, you can uninstall it from 'Control Panel\Programs\Programs and Features' (Windows 10/11), just as you would uninstall any other application from your system.
Additional Information
Known Issues
Contact
Author/Company Information
Support Information
You can write your questions directly to support@joinercad.com or via JoinerCAD support system, which can be found in the JoinerCAD ribbon.
Version History
| Version Number | Version Description |
|---|---|
|
3.2.0 |
NEW - Added Configuration Design support for Smart Hardware components. NEW - Added the new Copy Config command to copy parameters and configurations between components. NEW - Added the ability to define a gap between panels when trimming in Skeleton Design. IMPROVED - Full support for the Intent-Driven Design workflow with environment-aware commands. IMPROVED - Rewrote the Smart Hardware insertion mechanism for significantly faster placement and refresh after geometry changes. IMPROVED - Change Parameters can now be opened directly from the browser node. IMPROVED - BOMapp selection sync: selecting an item in BOMapp now highlights the corresponding component in Fusion. IMPROVED - JoinerCAD now fully adapts to Autodesk Fusion and OS themes. IMPROVED - Performance in Collaborative Hub, including faster automatic numbering. IMPROVED - Enhanced the reliability of the Sample Download mechanism. IMPROVED - Installation process for a smoother setup. IMPROVED - Expanded and refined translations for localized environments. FIXED - Fixed an issue where the Smart Hardware placement dialog closed if Direction was not selected. FIXED - Minor stability improvements and other small fixes. |
