
Fast Insert
Win64, EnglishGeneral Usage Instructions
- Install the application from the Autodesk App Store.
- Start Autodesk® Inventor®.
- Click the "Fast Insert" button on the "Assemble" tab in the Assembly environment.
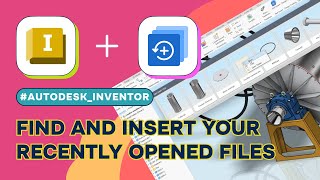
- A new window will appear, listing recent documents.
- Left-click on any card to insert the document as a new component occurrence.
- Right-click and select "Cancel" to complete the insertion command.
- Right-click on any card and select "Open" from the context menu to open the selected document in Inventor.
- Click the "Fast Insert" button on the "3D Model" tab in the Part environment. Select a recent part or assembly document—Inventor will open the Derive Component creation window.
- Click the "Fast Insert" button on the "Place Views" tab in the Drawing environment. Select a recent part or assembly document—Inventor will open the Base View creation window.
Screenshots


Commands
Installation/Uninstallation
Fast Insert command buttons are located on:
- "Assemble" panel of Assembly environment
- "3D Model" panel of Part Environment
- "Place Views" panel in Drawing Environment
The installer that ran when you downloaded this app/plug-in from Autodesk App Store will start installing the app/plug-in. OR, simply double-click the downloaded installer to install the app/plugin.
You can unload the plugin without uninstalling it by unchecking the "Loaded/Unloaded" check box associated with the plugin in the Inventor Add-In Manager. You may have to restart Inventor to completely unload the application.
To uninstall this plug-in, exit the Autodesk product if you are currently running it, simply rerun the installer, and select the "Uninstall" button. OR, you can uninstall it from 'Control Panel/Programs and Features' (Windows 10/11), just as you would uninstall any other application from your system.
Additional Information
Known Issues
Contact
Author/Company Information
Support Information
Version History
| Version Number | Version Description |
|---|---|
|
1.0.1 |
Fixed issue where the Thumbnails folder does not exist or the RecentDocuments.xml file is missing. |
|
1.0.0 |
First release. |
