
Pipe Support Generator (PSG)
Win64, EnglishGeneral Usage Instructions
Getting Started with PSG
Welcome to PSG! This section will guide you through the initial steps to get up and running with the software, from installation to creating your first 3D model.
After installing PSG and activating your license, you are ready to launch the software. Follow these steps to get started:
- Locate PSG: Open PSG from your desktop shortcut or the Start menu.
- Create a new Project: Select a support Mark type from the supports list and select path in your machine.
- Initial Screen: Upon launching, the software will load the main interface, where you can start working on your Pipe supports designs.
The PSG (Pipe Support Generator) User Interface (UI) is thoughtfully designed to provide users with an efficient and organized workspace. It is divided into three main areas, each focusing on specific aspects of the pipe support design process.
1. Support Marks Data Area
Located on the left-hand side of the UI, this area is dedicated to managing the data for support marks. By default, it includes the following three columns:
- Support Mark: Displays the unique identifier for each pipe support.
- Quantity: Indicates the number of units required for each support.
- Painting Code: Specifies the required paint or surface treatment for each support.
Users can enhance this area by adding additional columns from the Optional Value - Shortcut Menu, which include:
- Unit: Identifies the unit within the project where the support mark is required. This is useful for breaking down complex projects into manageable segments.
- Area: Indicates the specific area within the project where the support will be installed, ensuring clear organization in large-scale projects.
- Line: Refers to the piping line that the support mark is associated with, aiding in accurate placement and project coordination.
This customizable layout ensures users can adapt the data area to align with their project's specific requirements, improving both clarity and efficiency.
2. Accepted Support Marks Area
Located on the top-right side of the UI, this area displays the Accepted Support Marks. These support marks meet the project's predefined specification data, indicating they are ready for use in the design. This section enables users to focus on compliant and approved designs, facilitating smooth project progress.
3. Rejected Support Marks Area
Located on the bottom-right side of the UI, this area lists the Rejected Support Marks. These are the support marks that do not match the specification data, highlighting discrepancies that need to be addressed. By isolating these entries, PSG ensures users can quickly identify and resolve issues to maintain project integrity.
3. Adding Components to Your Project
PSG makes it easy to add data to the Support Marks Data Area by either importing data directly from an external Excel sheet or using the copy-and-paste method. Follow the steps below to seamlessly integrate your data:
Option 1: Importing Data from an External Excel Sheet
1- Prepare Your Excel File:
- Ensure your Excel file contains the necessary columns, such as Support Mark, Quantity, Painting Code, and any optional columns like Unit, Area, or Line.
- Verify that the data is formatted correctly to match your project specifications.
2- Access the Import Command:
- Right-click within the Support Marks Data Area to open the Shortcut Menu.
- Select the Import option from the menu.
3- Locate and Select the File:
- In the file explorer window, navigate to the location of your Excel sheet.
- Select the file and click Open.
4- Map the Columns (if required):
- Match the columns in your Excel file to the corresponding columns in PSG.
- Confirm your selection and click Import.
5- Review the Imported Data:
- Verify that the imported data is correctly populated in the Support Marks Data Area.
- Make any adjustments as needed.
Option 2: Copy and Paste from Excel
1- Select Data in Excel:
- Open your Excel file and select the cells you want to add to PSG.
- Ensure the data includes all necessary columns.
2- Copy the Data:
- Right-click the selected cells and choose Copy or use the shortcut Ctrl+C (Windows).
3- Paste Data into PSG:
- Right-click in the Support Marks Data Area of PSG and choose Paste from the Shortcut Menu. Alternatively, use Ctrl+V (Windows).
4- Verify the Data:
1. Check that the pasted data aligns correctly with the existing columns.
2. Make any necessary edits directly within PSG.
Before starting your project, it is essential to perform data validation to ensure that all Support Marks comply with the specified requirements. PSG offers a built-in validation feature to help users identify accepted and rejected support marks. This step allows for corrections before proceeding with project creation, ensuring accuracy and efficiency.
Steps for Data Validation
1. Navigate to the Validation Command:
o From the Top Menu, click on the Project tab.
o Select the Validation option from the dropdown menu.
2. Run the Validation Process:
o Once you select the Validation command, PSG will analyze the data in the Support Marks Data Area.
o The system will compare each support mark against the project specifications and criteria.
3. Review the Results:
o After the validation process is complete:
Accepted Support Marks:
These marks, which meet all specifications, will appear in the Accepted Support Marks Area at the top-right of the PSG interface.
Rejected Support Marks:
These marks, which do not meet the specifications, will be displayed in the Rejected Support Marks Area at the bottom-right of the PSG interface.
4. Resolve Issues for Rejected Marks:
o Review the rejected marks and identify the reasons for non-compliance.
o Make the necessary corrections in the Support Marks Data Area directly or in your source data (e.g., Excel file).
o Re-run the validation process to confirm that all issues have been resolved.
Benefits of Data Validation
- Error Identification: Quickly highlights any discrepancies or issues with support marks.
- Efficiency: Ensures that only compliant data is used in the project, reducing errors during project execution.
- Improved Accuracy: Helps maintain project standards by validating support marks against specified criteria.
PSG allows users to easily modify the details of a support mark directly within the Support Marks Data Area. This feature provides flexibility to make adjustments and ensures that the project data is always accurate and up-to-date.
Steps for Modifying Components
- Locate the Support Mark to Modify:
- Navigate to the Support Marks Data Area on the left-hand side of the PSG user interface.
- Identify the support mark and the specific cell you want to edit.
- Edit the Required Cell:
- Click on the cell that contains the value you want to change (e.g., Support Mark, Quantity, Painting Code, or additional project-related columns like Unit, Area, or Line).
- Enter the new value directly into the cell.
- Press Enter to save the changes.
- Perform Data Validation:
- After making modifications, it is recommended to validate the updated data to ensure compliance with project specifications:
· Go to the Top Menu, select the Project tab, and click on Validation.
· Review the updated results in the Accepted Support Marks Area and Rejected Support Marks Area to confirm the changes are valid.
It’s always a good idea to save your work regularly:
- Step 1: Click File > Save to save your project for the first time.
- Step 2: After saving, click File > Save to save any subsequent changes.
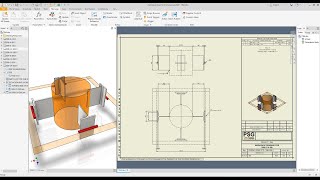
PSG provides a seamless way to generate and export all necessary outputs for your project, including 3D models, 2D fabrication drawings, detailed Bills of Materials (BOM), and surface area calculations. These outputs are essential for manufacturing and project execution, particularly for tasks like painting and material estimation.
Steps for Exporting Your Design by Inventor
1. Prepare the Support Marks Data:
o Ensure all required support marks have been added and validated in the Support Marks Data Area.
o Confirm that any necessary modifications have been made, and the data is free of errors.
2. Access the Build Command:
o Go to the Top Menu and select the Project tab.
o Click on the Build option to initiate the export process.
3. Start the Design Export Process:
o PSG will begin creating:
3D Models: Detailed CAD models of the support marks in your specified file format.
2D Fabrication Drawings: Precise technical drawings for manufacturing.
Bills of Materials (BOM): A comprehensive list of materials required for each support mark.
Surface Area Calculations: Detailed surface area, useful for tasks like paint estimation.
4. Review and Save the Outputs:
o Once the process is complete, review the generated files to ensure accuracy.
o Save the outputs to your desired location for further use or distribution.
If you ever need assistance:
- In-Software Help: Access the built-in help system by clicking the File > Manual. This will open the Instruction Manual for detailed instructions on all PSG features.
Online Tutorials: Visit our YouTube channel for more resources, including Tutorials.
Screenshots


Commands
Installation/Uninstallation
Installing PSG on Your Computer
Follow these steps to install PSG on your system. Ensure your computer meets the minimum requirements.
Step 1: Download the Installer
Download the PSG package compatible with Inventor (2020–2026).
Step 2: Prepare for Installation
- Ensure Inventor is installed and functional.
- Close all applications.
Step 3: Run the Installer
- Locate and double-click the downloaded file (e.g., PSG.exe).
- Follow instructions:
- Choose the installation directory (default recommended).
- Accept the EULA.
- Click Install.
Step 4: Activate Your License
- Run PSG. The Login window will appear.
- For first-time users:
- Register by filling out your details.
- Create a password and submit.
- Enjoy a 15-day evaluation period.
- Returning users: Log in with your email and password.
Notes:
- Contact us for activation at secadsolutions@gmail.com or contact@secadsolutions.com.
- For issues, ensure your Inventor version is supported.
Uninstallation:
- Open Control Panel > Programs and Features.
- Select PSG and click Uninstall.
Additional Information
- Installer Details
- Registry Settings: The installer modifies registry settings (HKEY_CLASSES_ROOT) to associate the appropriate icon with the application project file extension.
- Multiple Locations: The installer writes to multiple locations, specifically Program Files and AppData.
- Third-Party Dependencies: PSG relies on Newtonsoft.Json and Microsoft.IO.RecyclableMemoryStream.dll for functionality.
Privacy Policy
https://www.mediafire.com/file/lmaa2ds0qxjr3j6/Privacy_Policy_for_PSG_Software.pdf/file
PSG Instruction Manual
https://www.mediafire.com/file/0sozkjzf4obqat8/PSG_Instruction_Manual.pdf/file
PSG Bundle
https://www.mediafire.com/file/eo6tohmn2imrn6m/PSG_Bundle.rar/file
Known Issues
• Activation Delays: Occasionally, there may be delays in account activation due to server maintenance. Please be patient, and if activation takes longer than expected, contact support at support@secadsolutions.com.
• Software Compatibility: Some older versions of operating systems may not be fully compatible with the software. We recommend using the latest updates for optimal performance.
• File Export Issues: Certain complex models may experience issues during export. If you encounter this, please contact support with details, and we will assist you.
We are actively working to resolve these issues and appreciate your understanding.
Contact
Author/Company Information
Support Information
Support Information
For any assistance with PSG, our dedicated support team is here to help:
Email Support: Contact us at secadsolutuions@gmail.com & contact@secadsolutions.com for technical queries, troubleshooting, or general assistance.
Phone Support: Reach us directly at +20100-736-8077 for urgent issues.
Response Times:
- Emails and website inquiries are typically addressed within 24 hours on business days.
- Priority support is available for users under extended maintenance contracts.
We’re committed to ensuring your success with PSG and look forward to assisting you.
Version History
| Version Number | Version Description |
|---|---|
|
2.04 |
PSG V2.03 New Features New Features Introduced: cloud supports download |
|
2.03 |
PSG V2.03 New Features The following Support Groups XSH10 & XSH11 New Features Introduced: Service Checking – A tool for verifying crane service requirements and improving operational reliability. |
|
2.02 |
PSG V2.02 New Features The following Support Groups B05, B06, B07, B08, B09 & B10 As Per ErgoPraxis Pipeing Supports Specification. |
|
2.01 |
First App Store release. |
