
ToNest
Win64, EnglishGeneral Usage Instructions
Getting Started with ToNest
Welcome to ToNest! This section will guide you through the initial steps to get up and running with the software, from installation to creating your first 3D model and nesting study.
After installing ToNest and activating your license, you are ready to launch the software. Follow these steps to get started:
- Locate ToNest: Open ToNest from your desktop shortcut or the Start menu.
- Create a new Project: Give a name for your project and select the path in your machine.
- Initial Screen: Upon launching, the software will load the main interface, where you can start working on your sheet metal designs.
The ToNest user interface (UI) is designed to be intuitive and easy to navigate. Familiarizing yourself with the basic elements of the interface will help you get comfortable quickly.
- Main Ribbon: The top toolbar contains icons representing different shapes of sheet metal parts (Square, Rectangular, Parallelogram, Trapezoid, Circular Shapes, etc.).
- Project Browser: On the left side, you'll find the project browser, which shows the components (sheet metal item type) in your current project.
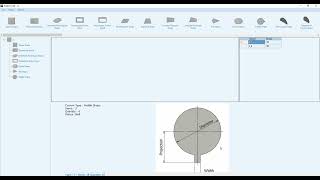
- Workspace: The top large central area is the sheet metal item table of dimensions form with image at the bottom to indicate the required data you should fill for your sheet metal parts table, on the right-hand side you will find the material density table.
3. Adding Components to Your Project
Once your project is set up, you can begin adding components to your design:
- Step 1: Select a component type from the Main Ribbon, such as a Squire or Paddle.
- Step 2: The properties for that component will appear in the Properties Palette. Adjust parameters like dimensions, material – fill the other items dimensions.
- Step 3: Continue adding other components as needed for your design.
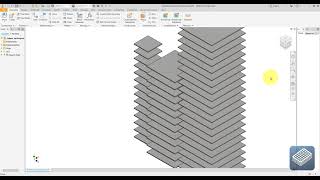
- Step 4: Place the component in your 3D workspace over Autodesk® Inventor® by clicking on build from the Project menu, once you did that, the 3D model (Assembly of the sheet metal, parts and assemblies shall be generated).
You can modify any component at any time:
- Step 1: Reset the project.
- Step 2: Select the component in the (ToNest tree) Project Browser.
- Step 3: In the Properties Palette, adjust the dimensions, material, or other parameters to suit your design.
- Step 4: Clicking on build from the Project menu, once you did that, the 3D model (Assembly of the duct, parts, and drawing shall be updated.
It’s always a good idea to save your work regularly:
- Step 1: Click File > Save to save your project for the first time.
- Step 2: After saving, click File > Save to save any subsequent changes.
6. Start your Nesting Study
Once you’ve completed your design, you can start the nesting study:
- Step 1: Select the assembly and create the nesting study by using the Inventor Nesting tool.
If you ever need assistance:
- In-Software Help: Access the built-in help system by clicking the File > Manual. This will open the Instruction Manual for detailed instructions on all ToNest features.
- Online Tutorials: Visit our YouTube channel for more resources, including Tutorials.
Screenshots


Commands
Installation/Uninstallation
Installing ToNest on Your Computer
Follow these steps to install ToNest on your system. Ensure your system meets the minimum requirements.
Step 1: Download the Installation Package
Download the version compatible with Inventor (2020–2026).
Step 2: Prepare for Installation
- Confirm Inventor is installed and functional.
Step 3: Run the Installer
- Double-click the installation file (e.g., ToNest.exe).
- Follow the prompts:
- Choose an installation directory.
- Agree to the EULA.
- Click Install.
Step 4: Activate Your License
- Launch ToNest.
- For first-time users:
- Register with your details.
- Receive a 15-day trial.
- Existing users: Log in with your credentials.
Notes:
- Contact us for activation at secadsolutions@gmail.com or contact@secadsolutions.com.
- For technical issues, confirm your Inventor version is supported or contact support.
Uninstallation
- Open Control Panel.
- Go to Programs and Features.
- Select ToNest and click Uninstall.
Additional Information
- Installer Details
- Registry Settings: The installer modifies registry settings (HKEY_CLASSES_ROOT) to associate the appropriate icon with the application project file extension.
- Multiple Locations: The installer writes to multiple locations, specifically Program Files and AppData.
- Third-Party Dependencies: ToNest relies on Newtonsoft.Json and Microsoft.IO.RecyclableMemoryStream.dll for functionality.
Privacy Policy
https://www.mediafire.com/file/lnm4c3tp4xoi9dp/Privacy_Policy_for_ToNest_Software.pdf/file
ToNest Instruction Manual
https://www.mediafire.com/file/gh8b9gfldki7nbx/ToNest_Instruction_Manual.pdf/file
Known Issues
Known Issues
• Activation Delays: Occasionally, there may be delays in account activation due to server maintenance. Please be patient, and if activation takes longer than expected, contact support at support@secadsolutions.com.
• Software Compatibility: Some older versions of operating systems may not be fully compatible with the software. We recommend using the latest updates for optimal performance.
• File Export Issues: Certain complex models may experience issues during export. If you encounter this, please contact support with details, and we will assist you.
We are actively working to resolve these issues and appreciate your understanding.
Contact
Author/Company Information
Support Information
Contact Information for Product Support
• Activate Your Account: For account activation, please email us at secadsolutions@gmail.com or contact@secadsolutions.com.
• Technical Support: If you experience any issues during the activation process or need assistance with the software, please reach out to our technical support team via support@secadsolutions.com.
• Support Hours: Our support team is available Monday to Friday, 9 AM - 5 PM (UTC). For urgent matters, please use the "Urgent" flag in your email subject.
We strive to respond to all inquiries within 24 hours. Thank you for choosing our products!
Version History
| Version Number | Version Description |
|---|---|
|
2.06 |
ToNest V2.06 Updates New items 1-Spiral welded pipe 2-Spiral welded Centric Reducer adding a new feature for QTY for each item |
|
2.05 |
ToNest V2.04 Updates New items and fixing some issues The Stop feature allows users to pause the current part-creation process in Autodesk Inventor. When activated, ToNest temporarily stops generating additional items, giving the user full control to resume the process at any time. This ensures flexibility during modeling and allows customers to continue building the remaining items whenever it is convenient. |
|
2.04 |
ToNest V2.04 Updates New items and fixing some issues |
|
2.03 |
ToNest V2.03 Updates New Feature Introduced: Service Checking – A tool for verifying ToNest service requirements and improving operational reliability. --------------- First release to App Store. |
|
2.02 |
ToNest V2.02 Updates Prism-Type1 Prism-Type2 (Top Truncated) Prism-Type3 (Top & Bottom Truncated) --------------- First release to App Store. |
|
2.01 |
First release to App Store. |
