
AstraPlant DWG Exporter
Win64, EnglishGeneral Usage Instructions
This guide outlines the typical workflow for using the DWG Exporter for Navisworks to convert your models into high-quality DWG files.
1. Launch the DWG Exporter:
- Open the model in Navisworks.
- Navigate to the exporter plugin, which will be available in the Navisworks user interface (e.g., in a dedicated ribbon tab or as an add-in).
2. Select Geometry for Export:
- Choose which parts of the model you wish to export. You can typically export the entire model, the currently selected items, or items hidden from view, depending on your needs.
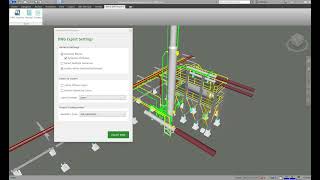
3. Configure Your Export Settings:
- Access the exporter’s main settings window. This is where you will control the output of your DWG file.
- Structure and Data: Enable Generate Blocks to group geometry into reusable blocks.
- Enable Generate Attributes to attach Navisworks property data to the corresponding blocks.
- Organization: Set the Layer Details option to define how layers are created (e.g., based on model hierarchy).
- Optimization: Enable Detect Multiple Instances to reduce file size by instancing identical geometry.
- Choose your Output Geometry Type (e.g., Polyface Mesh, 3D Faces, or Solids) to balance performance and editability.
- Enable Enable Vertex Sharing for further mesh optimization and file size reduction.
- Visual Fidelity: Adjust color settings like Utilize Diffuse Colors and Enforce Geometry Colors to ensure the visual appearance matches your source model.
4. Initiate the DWG Export:
- Once your settings are configured, click the "Export" or "Save" button to begin the conversion process.
- You will be prompted to specify a file name and location for the resulting .dwg file.
5. Utilize the Exported DWG File:
- The generated DWG file is now ready to be opened in AutoCAD or any other CAD software that supports the DWG format.
- The file will contain the optimized geometry and intelligent data you configured, ready for further drafting, analysis, or collaboration with teams working in a DWG-based environment.
Screenshots


Commands
Installation/Uninstallation
The installer that ran when you downloaded this app/plugin from the Autodesk App Store will start installing the app/plugin. Or, simply double-click the downloaded installer to install the app/plugin. You may need to restart the Autodesk product to activate the app/plugin. To uninstall this plugin, exit the Autodesk product if you are currently running it, simply rerun the installer, and select the "Uninstall" button. Or, click Control Panel > Programs > Programs and Features (Windows 10/11) and uninstall as you would any other application from your system.
Additional Information
Known Issues
Contact
Author/Company Information
Support Information
Please contact me via email: support@astraplant.com.
Version History
| Version Number | Version Description |
|---|---|
|
1.0.1 |
Handle large file |
|
1.0.0 |
Initial release |
