Shapespark
Win64, EnglishGeneral Usage Instructions
Importing models from Autodesk® Revit® is handled through a dedicated Revit add-in which is accessible from the Revit's Add-Ins menu.
- Make sure the Shapespark application is running.
- Open the Revit model.
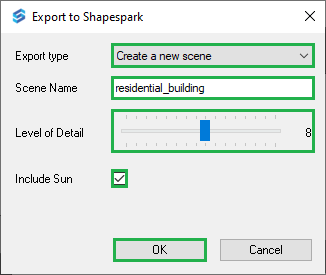
- Open the export dialog using the Export button from the Shapespark ribbon of Revit's Add-Ins menu.
- Configure the export:
- Export Type- Selects if a new scene is created or an existing scene is updated.
- Scene Name- The name of the scene in Shapespark.
- Level of Detail- Controls how parametric geometrical objects are transformed into Shapespark's triangle meshes. The higher the Level of Detail, the more triangles the objects have, which makes the objects smoother but also slower to load.
- Include Sun- If enabled, the Revit Sun is exported.

- Start the export and wait for it to finish.
- The exported scene is now added to the list of scenes in Shapespark.
Commands
Installation/Uninstallation
When you download this app/plug-in from the Autodesk App Store, the installer will automatically begin the installation process. Alternatively, you can double-click the downloaded installer to manually start the installation. To activate the app/plug-in, you might need to restart your Autodesk product.
To uninstall the plug-in, first exit the Autodesk product if it is currently running. Then, rerun the installer and select the "Uninstall" option. You can also uninstall the plug-in through the Control Panel by navigating to Programs > Programs and Features (Windows 10/11) and removing it like any other application.
You may need to restart your Revit program to complete the installation.
Additional Information
Known Issues
Contact
Author/Company Information
Support Information
Contact us at support@shapespark.com
Version History
| Version Number | Version Description |
|---|---|
|
3.3.9 |
Added support for Revit 2026. |
|
3.3.3 |
Export models from Revit directly to the Shapespark cloud. |


