
AG Height Manager
Win64, EnglishGeneral Usage Instructions
-
Run the tool.
-
Open your Revit project.
-
Click the “Height Manager” button from the Revit ribbon.
-
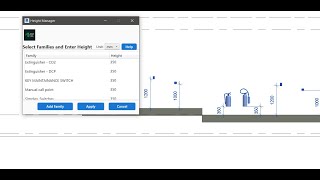
In the dialog window that appears:
-
Select one or more family types to adjust.
-
Enter the desired height offset value.
-
Choose the preferred unit: mm, cm, m, or ft.
-
-
Click Apply to confirm and process the selected families.
-
Select the elements in the model if prompted. The add-in will automatically adjust their elevations relative to floors, roofs, or structural elements.
-
Review the adjusted elements to ensure the results meet your project requirements.
You can cancel the operation at any time by pressing the Esc key.
Screenshots


Commands
Installation/Uninstallation
The installer that ran when you downloaded this app/plug-in from the Autodesk App Store will start installing the app/plug-in. OR, simply double-click the downloaded installer to install the app/plugin. Make sure that the Autodesk product is completely closed when running the installer.
To uninstall this plug-in, exit the Autodesk product if you are currently running it, simply rerun the installer, and select the "Uninstall" button. OR, click Control Panel > Programs > Programs and Features (Windows 10/11) and uninstall as you would any other application from your system.
Additional Information
Known Issues
Contact
Author/Company Information
Support Information
For any questions, suggestions, complaints, or requests, Mail: Elgendya33@gmail.com
Version History
| Version Number | Version Description |
|---|---|
|
1.0.0 |
Initial Release. |
