
Tagitize 2026
Win64, EnglishGeneral Usage Instructions
Once you have installed Tagitize, open Revit and activate the ribbon tab called. Next, decide which task you want to perform.
SETTINGS:
To tag one or more views or sheets, you first need to configure tagging settings. To do this, click the Tag Settings button. This will open the Settings window, where you can configure how the app should tag different Revit categories. After defining your preferences, click OK to save your settings.
Once settings have been saved, decide which view or sheet you want to tag.
TAG CURRENT VIEWS:
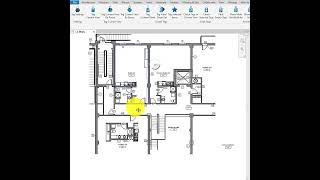
To tag the active view, click the Tag Current View button. The app will then scan the view for eligible elements and generate new tags for those. Once the command is finished, the app will open a new "Check Tags" window that lists all the new tags it created. From this new window, you can select individual tags by clicking on their rows. To see the selected tag in the view, click the Show button.
To try a different layout for the selected tags, click the Next button. The app will then generate a new layout for the tags selected and then move those tags to the new locations. You can repeat this as many times as necessary. To return to a previously shown layout, click the Previous button.
Another option to adjust generated tags is by using the Mirror or Flip button. The Mirror command will mirror the tag along the Y axis, essentially flipping it horizontally. The Flip button will flip the tag vertically.
Once you have finished adjusting generated tags, close the "Check Tags" window.
TAG CURRENT VIEWS BY ROOM:
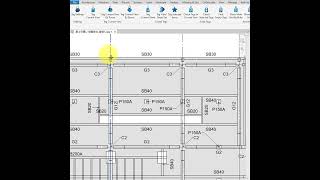
This command works similarly to the "Tag Current View" command but also groups tags of elements of the same family type and in the same room. Once the process is finished, you will also see the "Check Tags" window, which can be used to further adjust the generated tag layout to your preference.
TAG CURRENT VIEWS BY SPACE:
This command works similarly to the "Tag Current View" command but also groups tags of elements of the same family type and in the same MEP space. Once the process is finished, you will also see the "Check Tags" window, which can be used to further adjust the generated tag layout to your preference.
TAG CURRENT SHEET:
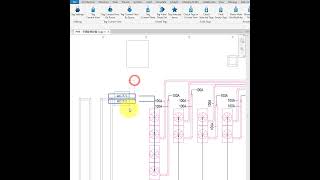
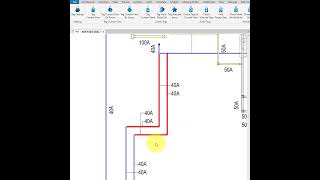
This command lets you tag all viewports on the active Revit sheet. Note that only viewports of floor plans, ceiling plans, sections, and elevations are currently supported. To use this command, open the sheet you want to tag and click the Tag Current Sheet button. The app will then activate each viewport on the sheet one by one and tag each view before moving on to the next.
TAG VIEW/SHEET SET:
This command lets you tag multiple views or sheets at once. First, click the button to see the view/sheet selection window. Here, the app will show all available views in the model on the top table. You can then select one or more views and then click the Add button to add those to the bottom table. Only views in this bottom table will be tagged.
If you already have view sets or sheet sets in the model, use the "Import View Set" button to quickly add all views in a set to the bottom table. Once all required views have been added, click the "Tag Selected Views" button to begin tagging. The app will then activate and tag each view one by one before moving on to the next.
After tagging all the specified views, the app will show the "Check Tags" window again to let you quickly adjust tag positions in the generated layout.
TAG SELECTED ITEMS:
Use this command if you only want to tag some specific elements in the view. To start, select these elements and then click "Tag Selected Items". The app will then tag only the items you selected and then open the "Check Tags" window to let you further adjust the generated tag layout.
CHECK TAGS IN CURRENT VIEW:
For a view that already contains some tags, click the "Check Tags In Current View" button to make the app check those existing tags for intersections against other tags or Revit elements. Note that only tags affected by your Tagitize settings will be checked. Once the check is complete, the app will show results in the "Check Tags" window. You can then use buttons on this window to move any overlapped tags to better positions.
CHECK SELECTED TAGS:
This works similarly to the "Check Tags In Current View" command. The only difference is that it only checks the tags you have selected in the view. You will also see the "Check Tags" window at the end, where overlapping tags can be seen and adjusted.
FIND EMPTY TAGS:
Click this button to scan Revit views for empty tags, i.e., those that appear as just a question mark. Once the check is complete, you will see a new window that lists all found empty tags in a single table.
Screenshots


Commands
| Ribbon/Toolbar Icon | Command | Command Description |
|---|---|---|

|
Tag Settings |
Configure settings for use during tagging of all visible or selected elements |

|
Tag Current View |
Tag all visible elements in the current view using the current tag settings |

|
Tag Current View By Room |
Group and tag elements by rooms that contain them |

|
Tag Current View By Space |
Group and tag elements by spaces that contain them |

|
Tag Current Sheet |
Tag all visible elements in the current view using the current tag settings |

|
Tag View/Sheet Set |
Tag all visible elements in the current sheet using the current tag settings |

|
Tag Selected Items |
Tag all selected elements in the current view using the current tag settings |

|
Check Tags in Current View |
Check which tags in this view intersect other tags or background elements |

|
Check Selected Tags |
Check which selected tags intersect other tags or background elements |

|
Find Empty Tags |
List all empty tags in one or multiple views |

|
Show/Hide Grid Bubbles |
Show or hide bubbles of selected grid lines |

|
Dimension Grids |
Create dimensions from selected grid lines |

|
Dimension Columns |
Create dimensions from selected columns and grid lines |
Installation/Uninstallation
The installer that ran when you downloaded this app/plug-in from the Autodesk App Store will start installing the app/plug-in. OR, simply double-click the downloaded installer to install the app/plugin.
You may need to restart the Autodesk product to activate the app/plug-in.
To uninstall this plug-in, exit the Autodesk product if you are currently running it, simply rerun the installer, and select the "Uninstall" button. OR, click Control Panel > Programs > Programs and Features (Windows 10/11) and uninstall as you would any other application from your system.
Additional Information
Known Issues
Contact
Author/Company Information
Support Information
For help and support, please contact support@tagitize.app
Version History
| Version Number | Version Description |
|---|---|
|
5.17.0 |
Add Revit 2026 support |
