
MEP Opening
Win64, EnglishGeneral Usage Instructions
MEP Opening Plugin Usage Instructions
1. Element Origin:
- In "Structure" and "MEP Discipline," choose the origin of structural and MEP elements.
- Choose between the current model or the linked model for each discipline.
- The linked model option is only available if there are links in the current model.
- If opting for "Linked Model," select the desired model from the list.
2. Validation Parameters:
- Activate/deactivate minimum distance checks and configure:
- "Distance to reference beam (cm)"
- "Distance to reference slab (cm)".
3. Optional Parameters:
3.1. Group openings:
- Activate/deactivate automatic grouping of horizontal and vertical created openings.
- Configure the desired tolerance.
3.2. Additional parameters:
- In "Name of the MEP discipline", enter a text for identifying openings (optional).
- The entered text will be used in a specific parameter for identification in the opening family created by the plugin.
- In "Standard opening gap (cm)," set the minimum clearance for openings concerning MEP elements.
- Examples:
· A gap of 0 (zero): Openings adjusted to MEP elements without additional clearances.
· A gap of 5 (five): Minimum 5 cm distance between MEP elements and the opening instance in all directions.
· Activate/deactivate the “Fill reference parameters” option to fill opening parameters with information from the structural and MEP elements involved in the clash.
- Use the diameter button to configure nominal diameters, set the default gap, and view equivalences.
3.3. Diameter Configuration:
- Clicking the diameter button opens a window allowing you to:
- Set the default gap for openings.
- Choose the nominal diameters considered by the plugin.
- Visualize the equivalence between MEP element diameters and the inserted opening diameter, considering the chosen gap.
4. Execution Scope:
- Select how you want to run the plugin:
- "Element selection": Openings for selected MEP elements.
- "Region bounded by elements": Openings in elements within the region bounded by the selected elements (structural and MEP).
- "Between levels": Openings in elements within the region bounded by two selected levels.
- "By section box": Openings in the crop region (floor plans) or section box (3D views), including invisible elements.
5. Execution:
- Click "Execute" after configuring the options and make selections according to the chosen scope.
6. Validations window:
- If you choose to perform checks in the ‘Validation Parameters' section and the plugin detects openings that violate specified distances, a new window will open. In this window:
- Filter openings by shape, validation rule and status.
- Easily view problematic openings by clicking on the eye icon.
- Delete unwanted opening instances by clicking on the trash bin icon.
- Select the desired status for each or multiple openings.
- Create review spheres to facilitate coordination by checking the desired boxes.
- Create a openings schedule by clicking on the “Create schedule” button.
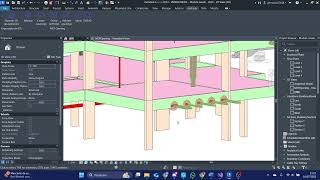
Screenshots


Commands
Installation/Uninstallation
The installer that ran when you downloaded this app/plug-in from the Autodesk App Store will start installing the app/plug-in. OR, simply double-click the downloaded installer to install the app/plugin.
You may need to restart the Autodesk product to activate the app/plug-in.
To uninstall this plug-in, exit the Autodesk product if you are currently running it, simply rerun the installer, and select the "Uninstall" button. OR, click Control Panel > Programs > Programs and Features (Windows 10/11) and uninstall as you would any other application from your system.
Additional Information
Known Issues
Contact
Author/Company Information
Support Information
For technical support, visit our website at www.itercode.com.br or contact us via email at contato@itercode.com.br.
Version History
| Version Number | Version Description |
|---|---|
|
1.3.2 |
Features and Improvements - Adjustment to allow the creation of opening families and revision spheres in models that do not have levels. - Bug fix where opening families and revision spheres were not being positioned correctly in models where the Project Base Point differed from the Survey Point. - Improved plugin performance in structural models with highly complex geometry. - Enhancement to the collision algorithm; structural models with complex geometry will no longer trigger errors during the opening family creation stage. |
|
1.3.1 |
Features and Improvements - Added links validation before execution to prevent running with unloaded links, with user notification. - Added conditional compilation for creating review spheres due to a subtle change in the 2024 API. - Improved handling of grouping for openings located very close to each other. - Fixed issue by skipping elements that do not have a bounding box. |
|
1.3.0 |
Features and Improvements - Improved opening validation flow and interface – it is now possible to run validation after creating openings. - Insertion of review sphere families to enhance design coordination workflows. - Updated opening families (R03) to include parameters such as numbering and visibility controls for review spheres. - Improved hole grouping flow, allowing selection between grouping only vertical openings, only horizontal openings, or both. - Added a field in the opening creation interface to control the filling of reference element information (e.g., passing pipe, trespassed structural element). Bug Fixes - Fixed a bug during user authentication caused by unstable internet connection. - Fixed a bug where opening grouping performed during creation used a grouping tolerance larger than the value set in the interface. - Fixed a bug where opening grouping was applied to the entire project when using the “Group in current view” button. |
|
1.2.0 |
Added a new openings grouping funcionality; Added a general settings UI to set grouping tolerance and validation distances; Added a new field in the main UI for automatic openings grouping; Added a new button for grouping openings previously inserted in the model; Changed the revision standard for opening families: a parameter will now be used to indicate the family version instead of the name; Added a model line to the family axes and standardized parameter units. |
|
1.1.2 |
Openings are now hosted on the closest level; Fix section box error when selecting invalid opening to inspect; Avoid creating duplicated opening when there's duplicated MEP or structural elements. |
|
1.1.1 |
Included an updated version of the openeing families, and now they show their revision number; Fix for handling short MEP elements and intersections; Error logs upload option; General bugfixes. |
|
1.0.0 |
Initial release. |
