
BIMify
Win64, EnglishGeneral Usage Instructions
1. Preparation
- Open your Revit project.
- Link your 2D Autodesk® AutoCAD® (DWG) file into the current view using the standard Insert > Link CAD command. Ensure the CAD file is visible in the active view.
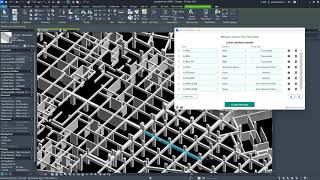
2. Launching BIMify
- Navigate to the BIMify panel on the Revit Ribbon (typically under the "Add-Ins" tab).
- Click the BIMify button to open the dashboard.
3. Selecting the Source
- In the BIMify window, use the dropdown menu or the "Select Link" button to pick the CAD Link you wish to convert.
- BIMify will automatically read the file and list all available layers found in the DWG.
4. Mapping Layers
- Review the list of CAD Layers detected.
- For each layer you want to convert, select the corresponding Revit Element Category (e.g., Wall, Column, Door) and specific Family Type from the dropdowns.
5. Execution
- Once your mapping is complete, click the Run (or "Create Elements") button.
- The plugin will process the geometry and generate the native Revit elements in the model.
- A confirmation dialog will appear once the process is complete, summarizing the number of elements created.
6. Verification
- Switch to a 3D View to inspect the generated model. Elements will be placed at the base level of the active view with the properties defined in your mapping configuration.
Screenshots


Commands
| Ribbon/Toolbar Icon | Command | Command Description |
|---|---|---|

|
BIMify |
Launches the BIMify dashboard. Allows the user to select a linked CAD file, map layers to specific Revit families (Walls, Columns, Doors), and automatically generate the 3D model. |
Installation/Uninstallation
The installer that ran when you downloaded this app/plug-in from Autodesk App Store will start installing the app/plug-in. OR, simply double-click the downloaded installer to install the app/plugin. You may need to restart the Autodesk product to activate the app/plug-in. To uninstall this plug-in, exit the Autodesk product if you are currently running it, simply rerun the installer, and select the "Uninstall" button. OR, click Control Panel > Programs > Programs and Features (Windows 10/11) and uninstall as you would any other application from your system.
Additional Information
Known Issues
- Curved Wall Intersections: While the plugin creates curved walls (arcs) effectively, complex intersections between arcs and straight walls may occasionally result in unconnected corners or minor gaps. These specific conditions may require manual "Wall Join" adjustments in Revit.
- CAD Precision Dependency: The quality of the generated model relies on the accuracy of the source CAD file. "Exploded" lines, microscopic gaps, or overlapping geometry in the DWG link may result in skipped elements or duplicate walls.
- Unsupported Geometry: Splines and Ellipses in the source CAD file are currently not supported and will be skipped during processing.
Contact
Author/Company Information
Support Information
For technical support, bug reports, or feature requests, please contact us at: www.linkedin.com/in/abhishek-khatavakar
We strive to respond to all inquiries within 24-48 hours (Monday-Friday).
When reporting an issue, please try to include:
- A brief description of the problem.
- Screenshots of the error message or behavior.
- If possible, a sample of the CAD file causing the issue would help us reproduce it.
Version History
| Version Number | Version Description |
|---|---|
|
1.0.0 |
Initial release |
