
Add Levels
Win64, EnglishGeneral Usage Instructions
Launch and Access the Plugin
- Open your Autodesk® Revit® project (ensure you're in a Project environment, not a Family document).
- Go to the Add-Ins tab on the Revit ribbon.
- Click the "Add Levels" button to launch the plugin.
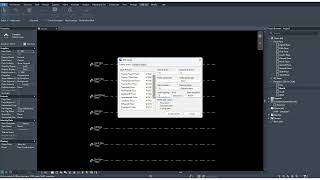
Create Levels tab
Use this tab to automatically create multiple levels with customized naming and view options.
Define Level Creation Settings:
- Above Levels / Basement Levels
Set how many levels to create above and/or below the base elevation. - Prefix / Suffix
Add custom text before or after each level name. - Naming Style
Choose a format for level names: - Numeric (e.g., Level 1, Level 2)
- Alphanumeric (e.g., First Floor, Second Floor)
- Only Number (e.g., 1, 2, 3)
- Start Index
Define the starting number for level naming (e.g., 0 for Ground, 1 for First). - Level Spacing & Elevation
Set the vertical distance between levels and specify the elevation of the base level. - Unit System
Choose between millimetres, centimetres, meters, feet, or inches for level spacing and elevation. - View Creation Options(optional)
Automatically create: - Floor Plans
- Structural Plans
- Ceiling Plans
Click "Create Levels"
The plugin will:
- Generate levels as specified
- Name them based on your settings
- Position them at correct elevations
- Create selected plan views automatically
Rename Levels tab
Use this tab to batch rename existing levels with find-replace or prefix/suffix logic.
Define Rename Settings:
- Level Preview
View and optionally select levels to rename. You can select multiple levels using Ctrl or Shift. - Find and Replace
Search for a specific word or string in level names and replace it with a new one. - Append Prefix / Suffix
Add a prefix and/or suffix to existing level names. - Only Selected Levels(optional)
Enable this checkbox to apply renaming only to selected levels in the list. If unchecked, all levels will be renamed.
Apply Changes:
- Click "Apply" to immediately rename levels in your project without closing the dialog.
This allows you to review the changes in Revit and make further adjustments if needed. - Click "Rename Levels" to commit the changes.
- Click "Cancel" to discard changes and close the dialog.
Screenshots


Commands
| Ribbon/Toolbar Icon | Command | Command Description |
|---|---|---|

|
Add Levels |
Create multiple levels based on user-defined spacing and naming styles. |
Installation/Uninstallation
The installer that ran when you downloaded this app/plug-in from Autodesk App Store will start installing the app/plug-in. OR, simply double-click the downloaded installer to install the app/plugin. You may need to restart the Autodesk product to activate the app/plug-in. To uninstall this plug-in, exit the Autodesk product if you are currently running it, simply rerun the installer, and select the "Uninstall" button. OR, click Control Panel > Programs > Programs and Features (Windows 10/11) and uninstall as you would any other application from your system.
Additional Information
Known Issues
Contact
Author/Company Information
Support Information
For product support, feature requests, or bug reports, please reach out via LinkedIn: https://www.linkedin.com/in/abhishek-khatavakar
We aim to respond to all queries within 1–2 business days.
Please include your Revit version and a brief description of the issue when contacting us.
Version History
| Version Number | Version Description |
|---|---|
|
2.0.0 |
Version 2.0.0 Added preview panel for levels. Added new feature "Rename Level" tab |
|
1.0.0 |
Version 1.0.0 – Initial Release First public release of the AddLevels Plugin for Revit. Automatically create multiple levels above and below a reference level. Customize level naming with prefix, suffix, and start index. Choose between numeric and alphanumeric naming styles. Set level spacing and starting elevation with unit selection. Optionally generate floor, structural, and ceiling plan views. Input validation and Revit-style controls for a smooth user experience. |
