
Autotag by Bimrock AI
Win64, EnglishGeneral Usage Instructions
GETTING STARTED:
- Install Bimrock Autotag from the Autodesk App Store.
- Open Revit and navigate to the Bimrock Autotag tab in the ribbon.
- The plugin comes with built-in default profiles - you can start tagging immediately.
CREATING A PROFILE:
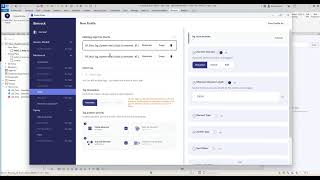
- Click "New Profile" in the Autotag panel.
- Select the MEP category (Mechanical, Electrical, or Plumbing).
- Choose your tag families and set filters to control which elements get tagged.
- Configure placement rules including spacing between tags, alignment preferences, and overlap avoidance sensitivity.
- Save the profile for reuse.
- Profiles work like View Templates but for annotation - define your rules once and apply them consistently across any view or project.
TAGGING A VIEW:
- Open the floor plan view you want to tag.
- Select a profile from your profile list.
- Click "Apply" — tags are placed automatically with overlap avoidance.
- Review and refine: use bulk edit to adjust tags, align leader elbows, or reposition as needed.
BATCH PROCESSING:
- Open the Batch Processing panel.
- Select multiple views from the view list - you can select across floor levels and disciplines
- Choose the profile to apply to all selected views.
- Click "Batch Process" — the queue processes all views automatically. Monitor progress in the status panel.
- Review results across views when the queue completes.
SHARING PROFILES (Teams):
- Profiles can be shared across team members for consistent annotation standards. Team admins manage licenses via the Team Management panel.
- For detailed documentation with 13 step-by-step guides, visit: https://bimrock.ai/docs
Screenshots


Commands
Installation/Uninstallation
The installer that ran when you downloaded this app/plug-in from the Autodesk App Store will start installing the app/plug-in. OR, simply double-click the downloaded installer to install the app/plugin. Make sure that the Autodesk product is completely closed when running the installer.
To uninstall this plug-in, exit the Autodesk product if you are currently running it, simply rerun the installer, and select the "Uninstall" button. OR, click Control Panel > Programs > Programs and Features (Windows 10/11) and uninstall as you would any other application from your system.
Additional Information
-
- Freelancers/Consultants: $49/mo (1 floating license)
- Firms/Studios: $199/mo (5 floating licenses)
- Enterprise: Custom pricing — contact sales@bimrock.ai
- All plans include a 14-day free trial, no credit card required
- Yearly billing available (2 months free)
-
- Processing runs on Google Cloud Platform with industry-standard certifications
- Data encrypted in transit and at rest
- Uploaded data deleted within 60 days of last request
- We do not use your data to train AI models
- Customer owns all output (tagged views, reports, exported data)
- For full details, see our Privacy Policy: https://bimrock.ai/privacy-policy/
-
- Works with Revit linked models and workshared (file-based) projects
- Supports native and custom Revit families
- All MEP disciplines plus general architectural elements
Known Issues
Contact
Author/Company Information
Support Information
-
- support@bimrock.ai - 24-hour response SLA
-
- https://bimrock.ai/docs/ - 13 step-by-step guides covering installation, profile creation, batch processing, team setup, and troubleshooting.
Community:
-
- Join the Bimrock AI Discord for tips, peer support, and feature requests - https://discord.gg/HQFWAGjBcY
-
- Book a call at https://cal.com/bimrock-ai/discovery-call
- Firms and Enterprise tiers include guided onboarding with profile co-creation for your specific workflows.
Version History
| Version Number | Version Description |
|---|---|
|
2.1.10 |
Initial public release - profile-based MEP annotation automation for Revit 2023-2026. |
